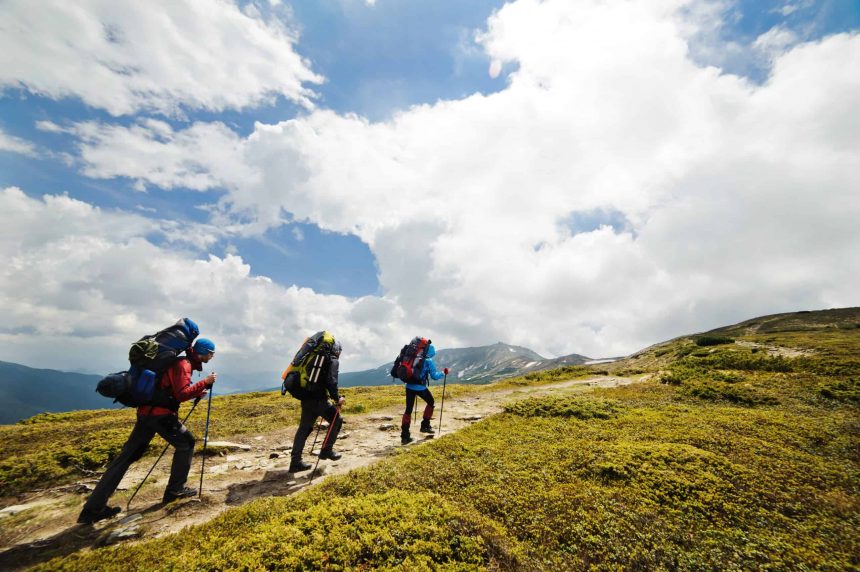
The last hike I went on was 28 miles over the rugged Mendip Hills in South West England.
It’s a landscape of steep hills and rough farmland, rising and falling through miles of the open floodplain on both sides.
Luckily there aren’t many dangerous animals to worry about in that part of the world.
However, if you’re hiking for 20 miles anywhere with rough terrain and big open areas you absolutely have to cover these 10 steps.
Table of Contents
1. Get the Three Most Important Items Right
Footwear. Rucksack. Underwear.
There are too many problems to list if you get any of these three things wrong.
So here are just a couple of examples and the easy ways to avoid them.
Bad boots mean possibly hike-ending injuries.
Blisters are especially difficult to deal with because they happen so quickly.
You can be fine and happy in your new boots one minute and in agony with bad blisters the next.
The key to avoid this is to wear a trusted pair of boots, but we’ll get onto that later. Your choice of socks shouldn’t be taken lightly either.
It’s easy to overlook just how important they are. I’ve always found Ski socks to be the best for hiking.
They reduce the friction between boot and sock and are usually good at removing moisture from your feet.
Bad Rucksack means constant discomfort.
It nags at you the whole time and means you are constantly readjusting and changing the way you walk.
This means you end up putting unnecessary weight on one leg to compensate for the discomfort, which then means your thigh muscles start screaming at you.
So then you compensate for that and another part of your leg gets undue stress.
A bad rucksack is a recipe for disaster on a 20-mile hike.
Make sure your straps are all working and DO NOT BUY A NEW BAG without road testing it.
Bad underwear means painful chaffing.
Is there anything worse than the inside of your upper leg chaffing?
When talking about little, niggling injuries the answer is no.
It can be a real agony. That’s why it’s so important to wear the right underwear on a long hike.
Wear stretchy underwear with plenty of giving.
Again, Ski Wear is really good for this because they’ve been designed to reduce friction on swerving ski runs.
One thing to avoid is cycling shorts. They might look like the perfect product but actually they tend to be too tight for hiking.
I’ve had some pretty intense sores from wearing cycling shorts.
They are especially bad in high temperatures where your sweat begins to irritate the chaffing.
Avoid at all costs.

A Tip From The Road
- I always pack a little tub of Vaseline when I’m on a hike of more than 10 miles.
If your underwear, boots or bag start rubbing then Vaseline is the best cure.
Obviously prevention is the best medicine, but Vaseline is the best cure for these issues if they come up and always good to have with you.
It’s also good for remedying the irritation of mosquito bites.
A real all-rounder.
2. Check your bag weight in advance
It’s so easy to pick up your bag before a long hike and think it doesn’t weigh much.
The reality is that you’re probably wrong, because everything is lighter when you’re sat comfortably at home.
The problems start when your shoulder starts cramping on mile 12 or your lower back stiffens every time you walk uphill.
A Tip From The Road
- Road Test the weight
Pack your bag up a few days before and wear it out to the local shop.
Keep it on while you walk around.
Get a feel for how the weight affects you while you bend over to grab that can of tomatoes or reach into the freezer for the last tub of ice cream.
If your bag gives you trouble on a simple trip to the shop, it’s too heavy for a 20-mile hike through the countryside.
3. Be Careful What You Bring
This follows on from the last point. One mistake I made on my last hike was taking two pairs of shoes.
I thought I would need comfortable trainers and some waterproof boots.
Unfortunately, the boots simply took up a lot of space and weighed down my bag.
So I had to carry a pointless item the whole time.
So my bag was too heavy and I wasted mental energy being annoyed with myself every time I walked uphill.
A Tip From The Road
- Pack multi-purpose items
You need to be creative when packing your back if you’re going to be ready for a 20-mile hike.
This means finding items that have more than one purpose.
When it comes to footwear, I found that two plastic bags are a great way to waterproof comfortable footwear.
During my last hike, I actually took two plastic bags and placed my feet in each one.
Then placed my feet in the trainers. A simple hack for waterproof trainers.
I wish I had thought of it before lugging around my boots.
Obviously, the real solution here is to buy a pair of boots you are comfortable walking long distances in.
No piece of equipment is more important.
4. Don’t Use Brand New Equipment
Once you’ve decided exactly what you need to bring, don’t go and buy any new, shiny versions.
Your adventurous 20-mile hike is not the time to try out new things.
What you really want are the tried and tested boots, you’re comfortable watch and a rucksack that you KNOW doesn’t rub on your shoulders.
To feel that horrible scratching halfway through a long hike is such a terrible feeling. So avoid it by staying loyal to your kit.
We all expect a bit of pain. In many ways, that’s part of the allure of a long hike.
But what you don’t want is ‘avoidable pain.’
That can turn a great experience into a very frustrating one.
A Tip From The Road
- Wear your new kit in
If you have to buy a new kit then test it out on shorter trips.
A lot of new kit needs a bit of breaking in.
The mistake so many people make is turning up for a real test of their hiking endurance with a new kit, believing that it will help them somehow.
Nine times out of ten it won’t.
5. Pick Low GI Food for Energy
GI refers to the Glycemic Index, which is a system used to determine how quickly carbohydrates affect your blood sugar levels.
For a long hike, low GI foods will release energy into your body slowly.
This means you won’t get hungry and your energy will stay steady and constant.
Foods with a low GI include beans, grains like Quinoa and porridge oats.
All amazing ingredients for a hearty breakfast before your hike.
You can see more recipes for all camping trips here (Insert Internal Link).
There are also some great trail bars, made up of dried fruits and nuts that are a quick and easy low GI snack for the road.
On the flip side, try to avoid high GI foods like white bread and sugary drinks.
They won’t do you any favors even if the initial sugar spike seems to help.
A Tip From The Road
- Make your own Trail Bars
If you are thinking of packing trail bars then try them out before you go.
Just like with your equipment, you don’t want to accidentally cause yourself some unnecessary discomfort during the 20-mile hike.
Or why not try the recipe at the end of this article and make your own?
6. Give Yourself Little Treats Along the Way
Ok so this slightly contradicts the last point about but sometimes the rules are there to be broken. Just a bit.
There will be tough parts of this hike. Times when the huge goal of 20 miles seems like a distant dream.
That’s why it’s so important to break it down into manageable pieces, with little rewards each time you hit a milestone.
For me, it’s always good to break 20 miles into 5-mile increments.
Four small hikes that make the whole. And at every interval maybe break the rule about low GI foods.
A handful of your favorite sweets won’t affect your blood sugar too much, plus the familiar taste will give you the psychological boost you need.
Especially during the last 5 miles.
A Tip From The Road
- Make your Rewards Hard to Find
I love mints. And my own self-control isn’t trustworthy after, say, 15 miles on the trail.
So I always hide my mints in parts of my bag that can only be reached if I stop and search for them.
This means I only eat them when I’m stopping for a rest stop.
This is something I do after learning that having your favorite sweet in your pocket means you also have no treats left halfway through your hike.
7. Remember to Enjoy the Scenery
It’s so easy to get lost in the step by step marathon of a long hike.
Remember to get your head up once in a while and enjoy the scenery around you.
A 20-mile hike is unique because you are likely to see a few different types of terrain.
It’s a real adventure and, like all things, the journey itself is just as important as any end goal.
A Tip From The Road
- Keep your Phone on Airplane Mode
If you set your phone to airplane mode you can still take some photos without the distractions of the world around you breaking into your hike.
The photos are great. But remember that this hike is unique to the people on it.
There’s something amazing about having very little to show people when you get home, apart from a pair of dirty boots.
8. Have some Music or Podcasts for the Hard Miles
The middle miles are often the hardest. There’s always a stretch of repetitive terrain where an album or two can make all the difference.
Some people listen to music the whole way, although there’s an argument to say hearing the calls of local birds and the hum of tractors in the distance should be cherished.
It’s true that sounds change as distinctly as the landscape on a long hike, and can really enrich your adventure.
However, there are always ‘hard miles’ and it’s essential to have some familiar sounds as a backup, even if you don’t end up using them.
A Tip From The Road
- Don’t use Headphones
Sometimes your music can actually add to the sounds of nature.
I actually love listening to podcasts through a speaker on long hikes.
You don’t always catch every word but the murmur of a few other voices can act as the great company while your senses remain alert to the landscape around you.
9. Have Someone Meet you at the End
If you walk solo then have someone meet you at the end of your route.
There’s something incredibly rewarding about seeing a familiar face at the end of a long solo 20-mile hike.
Even if it’s just silence you share on the trip home, it can be really special.
Having that shared experience of the ‘end of the road’ is something neither of you will forget in a hurry.
Plus, you might just inspire them to come with you on the next one.
A Tip From The Road
- Buy a Basic Phone
I always have my smartphone stored away in my bag on a long hike.
Just for emergencies. However, it’s always off.
For less than £10 you can get a basic phone for that call to your lift home.
That way it allows you to avoid the internet on hike day. So you can stay completely in the moment.
10. Write a Diary Afterwards
How did you feel after the hike? What did you notice about your mindset?
What challenges did you face? What was the best part of the hike?
The answers to these questions will bring you great pleasure six months after your first 20-mile hike.
It’s amazing to look back and reflect on just how profound such a long walk can be.
A Tip From The Road
- Don’t wait for more than two days
You need to capture your feelings straight away.
We all live busy lives and, before you know it, those brilliant ideas and deep thoughts will ebb away into the everyday.
The psychological benefit of a 20-mile hike is one of the most overlooked parts of the process.
So documenting that side of things, just like a few photos will capture the physical part, is hugely important.
The Best Meal That Keeps You Energetic During Hiking
If you’ve walked a 10-mile hike then you’re probably ready for the physical strain of a 20-mile hike.
The big difference is the mental side of things, plus keeping up the energy to push through the ‘wall’ of the last 5 miles.
The recipe below is a great mix for your very own homemade trail bars to help take your hiking game to the next level.
Hiking Bar Ingredients
Time to Cook
- Preheat the oven to 350F.
- Mix the oats with the flax seeds and whey protein.
- Add a little salt to the mixture as well. On the hike, the salt will help your body ward off cramp by holding moisture in the body.
- Add in the pumpkin seeds and raisins as well.
- In a separate bowl, stir the almond butter and milk together with the honey and cinnamon.
- Mix both bowls together. You should have a thick mixture ready for baking.
- Now lay it out on some heatproof paper in a rectangle, which should be around half an inch thick.
- It should take 20 minutes although anything past golden brown is too well done. It will be too hard to eat after that stage.
- Get the mix out of the oven and let it rest for at least 30 minutes.
- Cut it into bar-shaped treats and leave it in the fridge until you’re ready for that 20-mile hike.
Conclusion
That’s my article all about the 10 essential things you have to get right before you’re ready for a 20-mile hike.
Along with some tips and tricks from the road, plus an easy and delicious recipe for your own Hiking Bars.
Hiking is a wonderful thing. But are you ready to push past the norm and really adventure into the wild for 20 miles?
Leave me a comment to let me know your best practices.
Leave a Reply